
Start-up
of the MTS Hydraulic Stretcher |
Knud Larsen |
The hydraulic stretcher is situated in the D3 building, room 113.
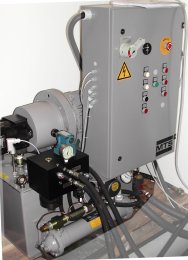
The pump [A] (left) and related cooling is placed in the machine room, building D3 room 106.
 B:
B:Letters in [] refer to illustrations on this page.
Start-up procedure
Ensure nobody is in the near vicinity of the machine, and particularly not strapped to it. Then follow this procedure to start up the machine:
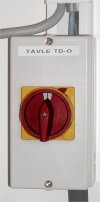
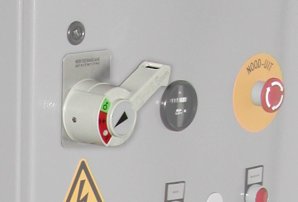
- In the machine room, ensure that both cooling and the pump is on.
Two switches: One on the wall (0 —> 1) [B] plus the handle on the control panel of the pump (green 0 —> red 1) [C]. - In the lab: Turn on the MTS control tower [D]: White switch at the back.
- Switch on the MTS PC (Compaq DeskPro model), let it boot.
- Switch on the Mr. Kick PC (if needed), let it boot.
- On the MTS PC log into Windows NT, let it start up.
- When the MTS PC is ready, start the TestStar II software
eg. by double-clicking the appropriate set-up file. - Log in to TestStar II and allow it to initialize hardware, "Download Firmware".
- It is recommended to pull the actuator away from any physical endstops first - or the software may get stuck in an error condition.
- If a communication error occours, you may have to shut down and go through this procedure from the beginning again.
- Verify reasonable limit and Sensor Zero Offset settings for the Angle signal (Adjust Input Signals).
- While holding the actuator well within limits, reset the controller by pressing the Reset button on the control panel next to the actuator. Verify that any Interlocks are cleared (LEDs left of Reset button)
- Apply pressure step by step:
- HPS Control Off -> Low: Press the Low button
- HPS Control Low -> High: Press the High button
- HSM Control Off -> Low: Press the Low button
- Wait a few seconds...
- HSM Control Low -> High: Press the High button.
This is when you really add power - be careful!
- Position the actuator near zero:
- Turn Actuator Positioning Control On
- Turn the knob till the wanted position is achieved
- Turn Actuator Positioning Control Off

Warm up procedure
- Load Function Generator
- From the menu choose Define Command:
- Control Channel must be Angle
- Control Mode must be Angle SG
- Units are ( deg )
- Set Initial ramp rate to 5 (deg/sec)
- Set Waveshape to Sine - to apply a sine wave for warming up..
- Compensation is Peak/Valley
- In the Function Generator main window you can now control the sine wave parameters:
- Mean is the baseline (offset) around which the sine will be applied. Set it to zero (midway between lower and upper limit)
- Amplitude is the peak-peak amplitude of the applied sine, start out at say 10° (ie. ±5°)
- Frequency is the number of cycles per second, start out at 0.5Hz
 When properly configured, ensure the actuator is free to move, then Press the Run button to start the movement.
- Slowly increase the amplitude so that the movement approaches the end limits without reaching them!
- Increase Frequency to 1Hz (or even 2Hz)
- Let it run for 10-20 minutes...
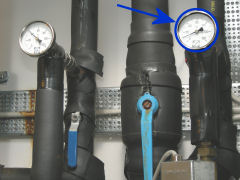
- In the machine room: Check that the cooling water has the proper temperature, ie. approx. 10 °C, max. 14 °C, [E] (right).
- Stop and Exit the function Generator - the system is now ready for normal use...
Shut down procedure
In case of emergency, press one of the three Emergency Stop buttons attached to the system.
Normal shut down:
- Remove pressure:
- HSM Control High -> Low: Press the Low button
- HSM Control Low -> Off: Press the Off button
- HPS Control High -> Low: Press the Low button
- HPS Control Low -> Off: Press the Off button
- Exit the control software, TestStar, etc.
- Shut down the PC's, etc.
| SMI, Fredrik Bajers Vej 7 D3, DK-9220 Aalborg, Denmark, Tel: +45 9940 8827, Fax: +45 9815 4008, E-mail: Contact-SMI | | | Updated 2009-01-23 |