
| Updated: 27-Sep-2005 16:32 | ||||||
Mr. Kick, Main Program Window |
||||||
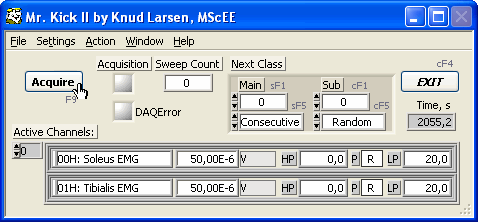 The data display window may dominate your screen when running Mr. Kick. Nevertheless it is the above illustrated window that represents the main program. Below you will find an introduction to each of the elements in that window: The Time indicator shows the number of seconds elapsed since Mr. Kick was started. Title and Menu bars, ExitThe blue title bar reveals that you are running Mr. Kick, made by Knud Larsen, MScEE. In the right end of the title bar you find the usual Windows Minimize, Maximize and Close buttons. The Close button is grayed out, indicating that it is disabled - to exit the program use the Exit button or choose Exit from the File menu. The menu bar is situated just below the title bar. From here you have access to control any aspect of Mr. Kick. The following menus are available: The menus found here and in the data display window are identical. Click the above links - or in the image - to learn more about individual menus. AcquisitionYou can start acquisition in two ways: Simply press the Acquire button (keyboard shortcut F9) or choose Acquire from the Action menu. The Acquisition LED are on during acquisition - and the menu bar will be disabled. If acquisition does not start and/or the red DAQ Error LED indicates an error, please refer to this checklist - and make sure that both hardware and software have been installed properly. The Sweep Count tells you the total number of sweeps acquired in the present series, i.e. since you last saved (or deleted) sweeps. The classification of sweeps is discussed below. ClassificationDuring acquisition the Next Class displays which class will be applied next. This goes for for classification modes only where Mr. Kick decides in advance, i.e. Manual, Stimulus Type and Stim. Protocol - not Analysis of Sweeps. You can control Stimulus Selection here as well: For the dimensions in use you can choose Manual, Consecutive or Random. If either Manual classification or stimulus selection mode, you can also set the class for the next sweep. Active ChannelsIn the Active Channels section you find an overview of the actual analog inputs: Only channels set On / Sampled in the Analog Input Settings. For each channel the following information is available: The first column shows the analog input channel number along with its label. The second column displays the actual sensitivity or gain settings and the third column the related unit of measure. A "x/" in the unit field reveals that gain is displayed in contrast to sensitivity. The last three columns tells about preprocessing: HP (LP) shows the high-pass (low-pass) cutoff frequency, zero if not applied. The P-column displays processing as follows:
|
||||||