Settings - Event Timing

Mr Kick Home

Event timers are your opportunity to trig other equipment with a well defined timing:
Mr. Kick can send out TTL pulses with a pre-set duration and delay relative to the time of an internal or external trigger.
A general overview of control outputs is available here.

Event timers are subject to classification: Each available event timer may be set with a different delay and duration - or turned on/off - for each defined event class.

The E-series MIO-boards all have two build-in timers (counters) that Mr. Kick uses for event timing. In the future the number of event timers may be increased by use of one or two dedicated timer board(s).

  1. Which Event Timers are Active?
  2. Pulse Delay, Duration and Polarity
  3. Edit All
  4. Digital Output
  5. Copy and Paste

Which Event Timers are Active?

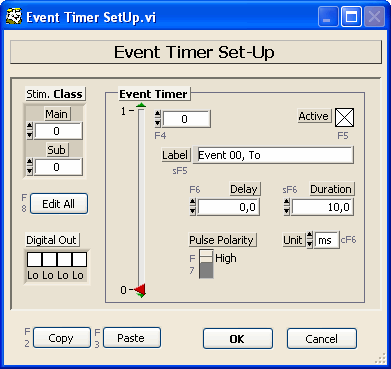
In the upper left corner of the dialog you can set which event (or stimulus) class, Stim. Class, is displayed below and in the right hand side of the dialog.

The number of classes available is defined under Settings - Classification: Set the Nmb Classes parameter, choose the Stimulus Type method and select the Act On - Event parameter.

You choose the timer by moving the timer slider up/down or by typing the timer number under the Event Timer heading: The timers are numbered from zero to 21, only no. zero and one is available if no dedicated timer board have been installed.
You are encouraged to name the timer according to the event triggered in the Label control. The name will be the same for all classes.

For each class each timer can be turned on or off by setting the Active control. One exception is timer no. zero, which also controls the timing of sweep acquisition in the internal and external digital trig mode, and therefore can not be turned off.

Note for external digital trig mode: Due to the small time slip between starting individual timers, some timers may catch an earlier trigger than the following. The Trig Ready/Gate signal, available at digital output line #6, may be used to blank out early triggers.

Pulse Delay, Duration and Polarity

Each active event timer will issue a single trig pulse per sweep. For each class and each timer you can set the following parameters:

  • Delay: The time from an incoming trigger to the onset of the event timer trig pulse. The incoming trigger may be an internal or external trigger as specified under Settings - Trigger. See note below!
  • Duration is the duration of the event timer trig pulse.
  • Unit is the unit of measure for both Delay and Duration: sec or ms (seconds or milliseconds)
  • Pulse Polarity specifies whether the event timer trig pulse will go low-high-low, named a High pulse, or high-low-high.

After an acquisition the Delay and Duration parameters will show the values actually obtained: Both are subject to quantization, and there are limits to how much they can differ. The minimum delay or duration is 150 ns.

Note for internal and external digital trig mode: Event Timer no. 0 controls the delay of acquisition of sweeps, i.e. the delay set for this timer will also be the delay from an incoming trigger to time zero in any sweep! - Event Timer no. zero can not be turned off!
By defining a number of event classes and set the timer no. zero delay different in these classes you can acquire sweeps with different delays relative to the trigger.
A conditioning stimulus prior to the sweep can be achieved by setting some delay for timer no. zero and a shorter delay for the conditioning stimulus event timer.
Delays can not be negative (would violate causality).

Note for external analog trig mode: Data acquisition can not be delayed in this trig mode, i.e. preconditioning stimuli are not available. On the positive side event timer no. zero is free for other purposes.

Edit All

The Edit All button gives access to another view of delays and durations in all classes and for all timers (pt. two) in one table.

Use the Display button [Page Down] to switch between Delay and Duration.

The left column shows the class ID.

You can edit event timer labels (column headers), delays and durations. A timer can also be turned on / off or set to high / low polarity:

  • To turn an event timer off: Choose a negative delay or a zero duration. If the delay is positive and duration is different from zero the event timer will be on.
  • The pulse polarity is set by the sign of the duration. A negative duration results in a Low (high-low-high) pulse, whereas a positive duration results in a High pulse (low-high-low).

Note: The above notes are still valid. The table contains simple text and features no error or range checking. Any mistyping may cause unpredictable results.

Digital Output

Mr. Kick will set a four bit digital pattern on digital output lines zero through three some time before the acquisition of a sweep. The Digital Out parameter specifies this pattern, which may differ from class to class.

Copy and Paste

If more timers share almost the same settings, you may copy all settings from one timer to another - or from one class to another.

Top - Menu